
Technical resources
Build/Deploy custom RHEL images on Microsoft Azure cloud platform
Red Hat Lightspeed, formerly Red Hat Insights, has a built-in tool (Image Builder) where any user can configure, create and deploy custom RHEL Images for cloud.
In this blog post, we would like to show how this tool can help you easily create and certify, ready-to-use custom RHEL images for the Microsoft Azure Cloud environment.
You can follow the steps from this blog post, or the video walkthrough that Sushilkumar Deshmukh and Jayesh Garg created for this purpose :
Prerequisites
- Configure RHEL Image Builder as an authorized application for your tenant GUID
- Give it the role of Contributor to at least one resource group. To authorize Red Hat Image Builder as an authorized application.
- You have a Subscription account created in Microsoft Azure.
- You have an existing Resource Group in Azure portal.
- You have the User Access Administrator role rights.
- Your Microsoft Azure subscription has Microsoft.Storage and Microsoft.Compute as a resource provider.
- The user should have intermediate RHEL knowledge
How to create a custom Image (Image Builder)
- Access Red Hat Image Builder on a browser. The Red Hat Image Builder dashboard appears.
- Click Create image. The Create image dialog wizard opens.
- On the Image output page, complete the following steps:
- From the Release list, select the Release that you want to use: for example, choose Red Hat Enterprise Linux (RHEL).
- From the Select target environments option, select Microsoft Azure.
- Image
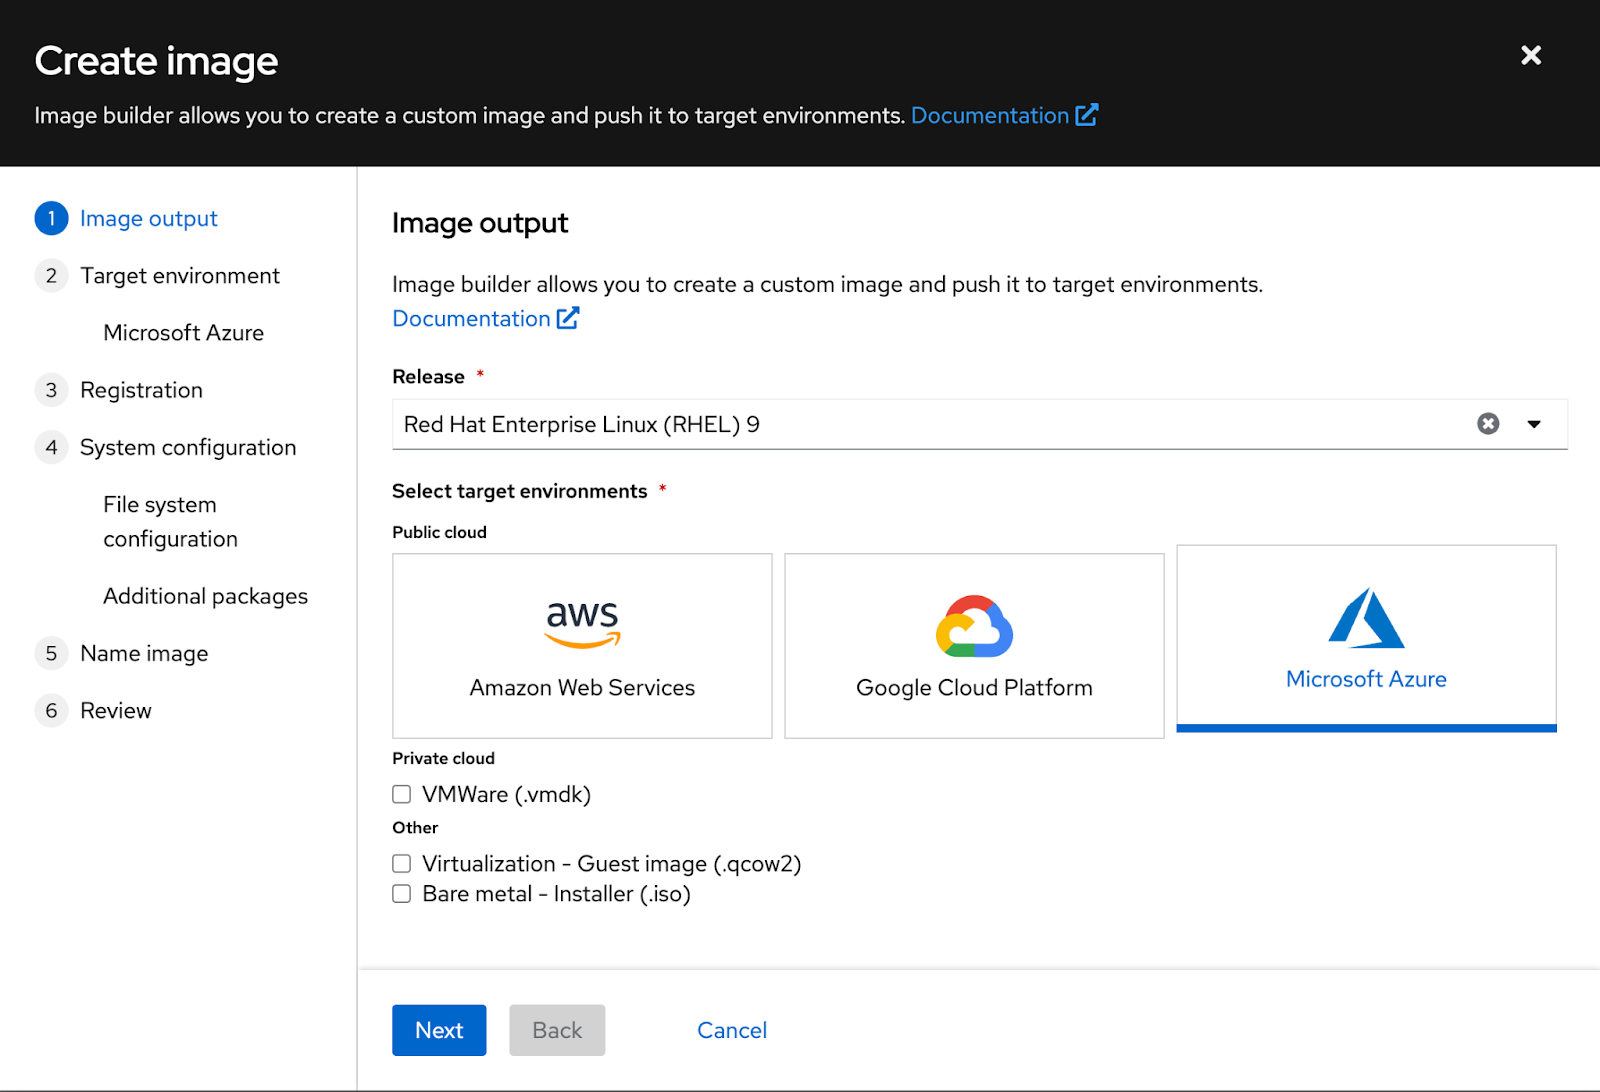
Click Next
- On the Target Environment - Microsoft Azure window, complete the following steps:
- Enter your Tenant GUID: you can find your Tenant ID in the Azure Active Directory application in Microsoft Azure Portal.
- Enter your Subscription ID: you can find your Subscription ID account by accessing the Microsoft Azure console.
- Enter your Resource group: is the name of your Resource Group in Microsoft Azure Portal.
Click Next
- On the Registration page, select the type of registration that you want to use. You can select from these options:
- Register images with Red Hat - Register and connect image instances, subscriptions and insights with Red Hat. For details on how to embed an activation key and register systems on first boot.
- Register image instances only - Register and connect only image instances and subscriptions with Red Hat.
- Register later - Register the system after the image creation. Registration can be done by a RHUI/Redhat subscription client user according to azure agreement.
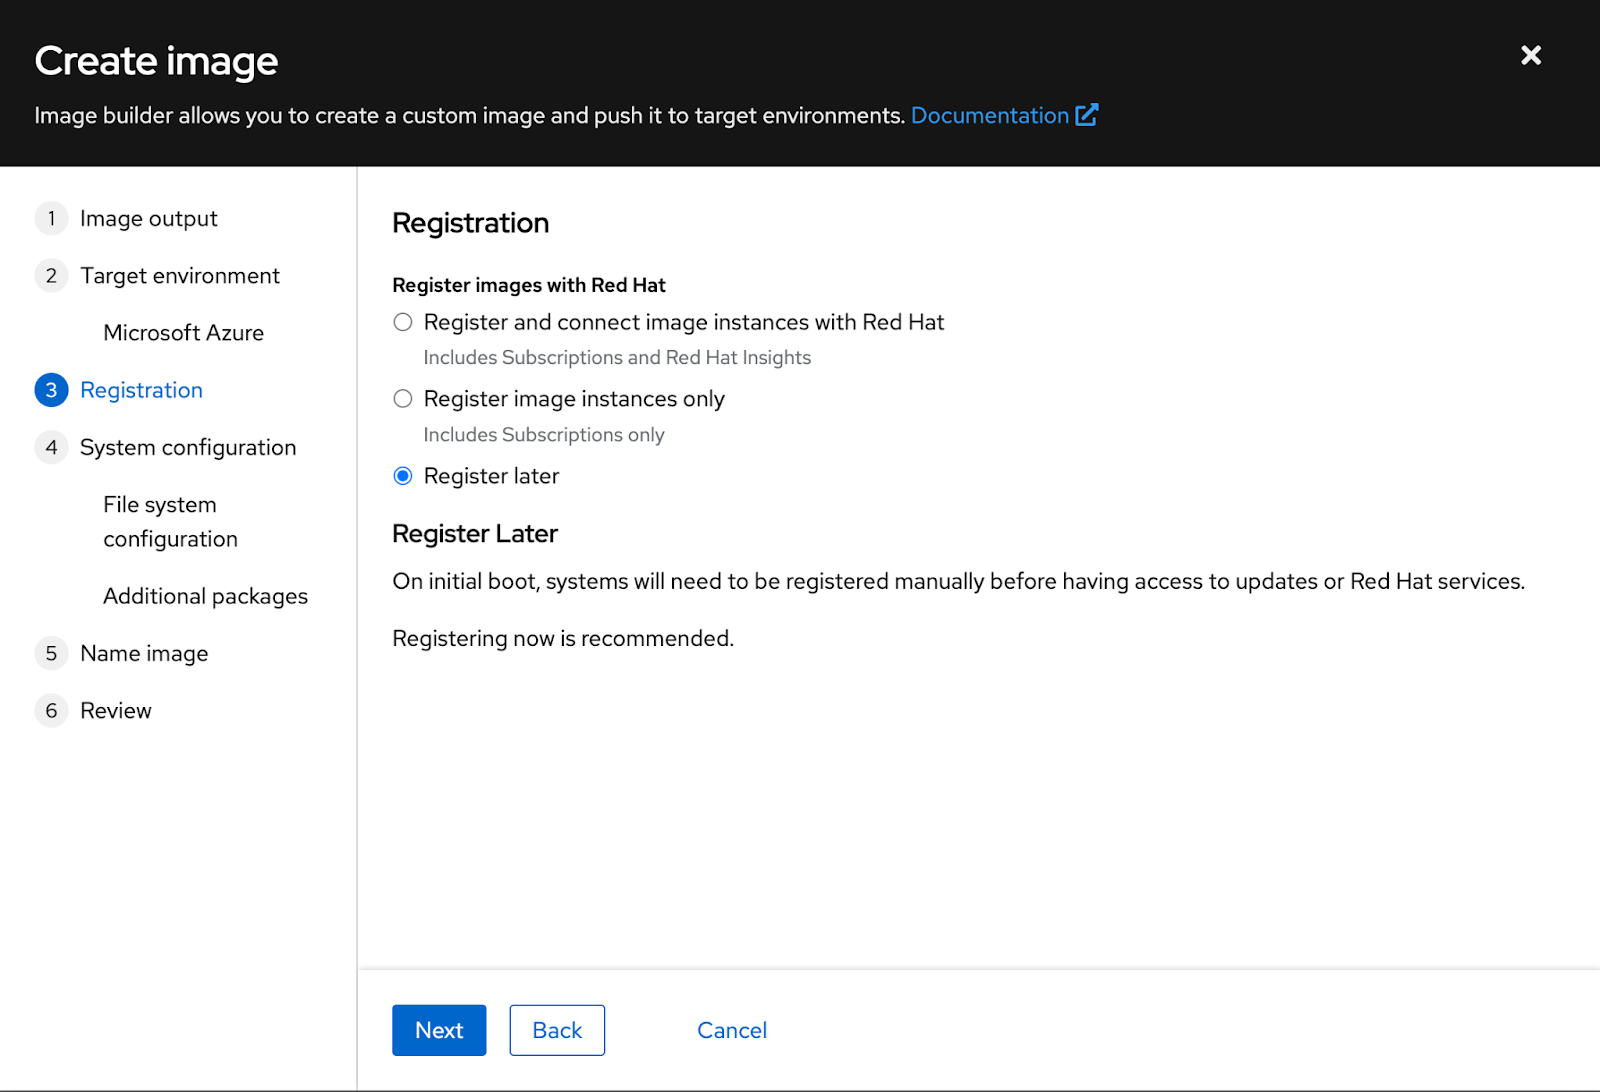
Click Next.
On the Packages page, add your desired packages to your image.
Image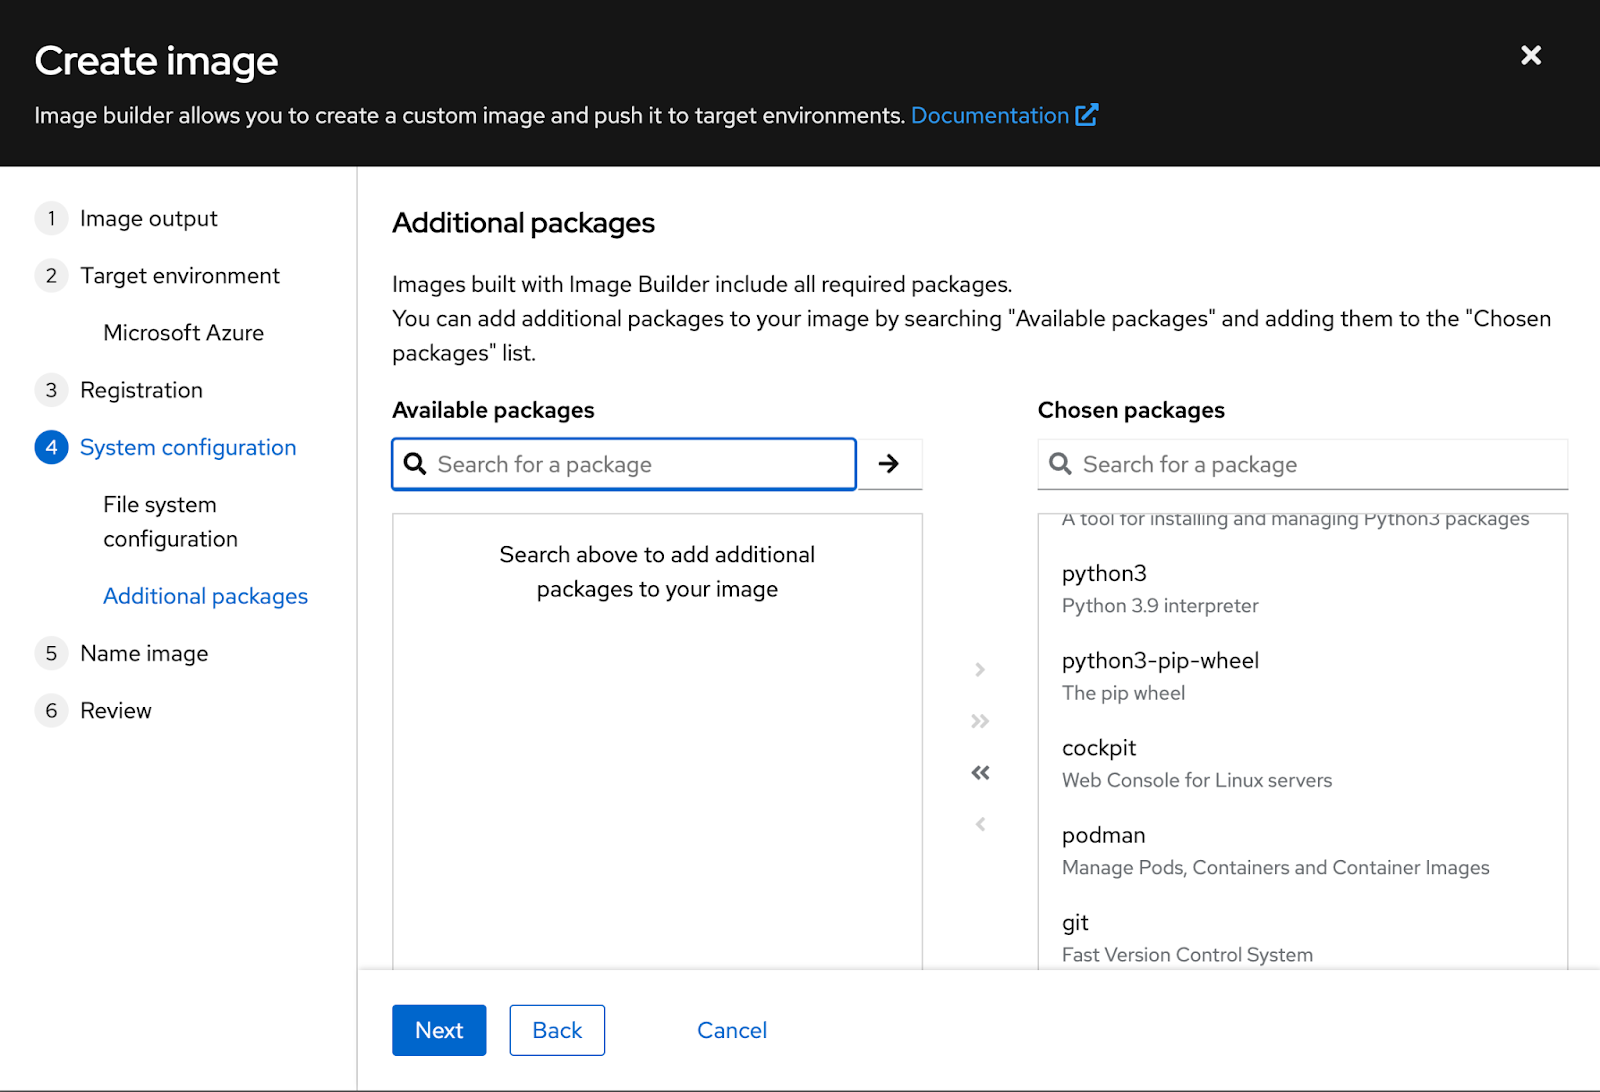
- On the Name image page, enter a name for your image and click Next. If you do not enter a name, you can find the image you created by its UUID.
- On the Review page, review the details about the image creation and click Create image.
After you complete the steps in the Create image wizard, the Image Builder dashboard is displayed.
Red Hat Image Builder starts the compose of a RHEL Azure Disk Image image for the x86_64 architecture, uploads it to the resource group account you specified, and creates an Azure Image.
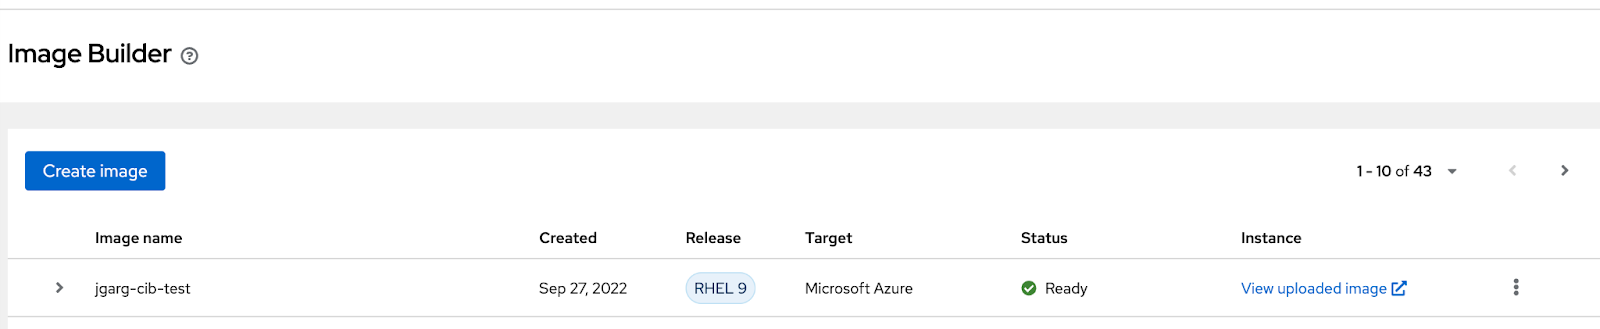
Check if the image status is Ready. It means that the image upload and cloud registration completed successfully.
Once the image is ready, you can continue to the next step : Deploying a VM from the RHEL image on Microsoft Azure
How to deploy / Create a VM from the RHEL system image shared with your Azure account
You can create a Virtual Machine (VM) from the image you shared with the Microsoft Azure Cloud account by using Red Hat Image Builder.
Click on View uploaded Image in front of the image you created. It will direct you to Microsoft Azure Resource group Where you can create a new VM.
Image
- Click + Create VM. You are redirected to the Create a virtual machine dashboard.
- In the Basic tab under Project Details, your Subscription and the Resource Group are pre-set.
- Under Instance Details, insert:
- Virtual machine name
- Region
- Image
- Size: Choose a VM size that better suits your needs. For Certified Cloud Service Provider, it is recommended for at least 1GB of RAM. Keep the remaining fields as in the default choice.
- Under Administrator account, enter the following details:
- Username: the name of the account administrator.
- SSH public key source: from the drop-down menu, select
- Generate new key pair.
- Key pair name: insert a name for the key pair.
- Under Inbound port rules:
- Public inbound ports: select Allow selected ports.
- Select inbound ports: Use the default set SSH (22).
- Under License type select Red Hat Enterprise Linux.
- Click Review + Create. You are redirected to the Review + create tab. You receive confirmation that the validation passed.
- Review the details and click Create. To change options, click Previous.
- A Generates New Key Pair pop-up opens. Click Download private key and create resources.Save the key file in the yourKey.pem file format.
- After the deployment is complete, click Go to resource.You are redirected to a new window with your VM details.
- Select the public IP address on the top right side of the page and copy it.
- Now you can ssh the machine.
Once your VM is created and ready to use, you can start the Red Hat certification process by following the steps indicated in the following chapter.
Certifying your custom image
In order to certify your cloud image, please follow the instructions described in this workflow guide. For more information about the certification and policy, please refer to this policy guide. If you have any questions on this process or about Red Hat certification, please contact us through your EPM or by email.
We will be glad to help you get certified !